Difference between revisions of "Alluxio User Guide"
Chentianjia (Talk | contribs) |
Chentianjia (Talk | contribs) (→我想上传数据到Alluxio内存中) |
||
| (29 intermediate revisions by the same user not shown) | |||
| Line 12: | Line 12: | ||
[[Image:dashboard_VM1.png]] | [[Image:dashboard_VM1.png]] | ||
| + | |||
| + | 可以在 http://10.1.0.180:19999/home 看到 | ||
= 我们的Alluxio = | = 我们的Alluxio = | ||
| Line 25: | Line 27: | ||
默认路径是/mnt/data,读取/写入数据请从新构造一个文件夹: | 默认路径是/mnt/data,读取/写入数据请从新构造一个文件夹: | ||
| − | == | + | == Alluxio的位置 == |
| + | cd /root/mesos/alluxio-1.5.0 | ||
| + | |||
| + | == 我想上传数据到Alluxio内存中 == | ||
| + | 首先把数据复制到 | ||
| + | mount -t nfs 10.1.0.180:/mnt/data /mnt/data | ||
| + | /mnt/data | ||
| + | 然后用 | ||
| + | ./mesos/alluxio-1.5.0/bin/alluxio fs ls / | ||
| + | |||
| + | 查看是否添加上去,复制完到Alluxio能读到一般需要一段时间请耐心等待。 | ||
| + | |||
| + | ./bin/alluxio fs load /XXX.txt把文件加载到内存中,15G文件一般要加载一分多钟。 | ||
| + | |||
| + | ./bin/alluxio fs ls /XXX.txt就可以看到该文件In Memory。 | ||
| + | |||
| + | 你可以简单的执行 | ||
| + | ./mesos/alluxio-1.5.0/bin/alluxio fs cat /XXX.txt | grep -c 0 | ||
| + | |||
| + | == 我想要在Ceph写数据 == | ||
| + | |||
| + | === 用Java === | ||
| + | import alluxio.client.file.*; | ||
| + | import alluxio.AlluxioURI; | ||
// 获取文件系统客户端FileSystem实例 | // 获取文件系统客户端FileSystem实例 | ||
FileSystem fs = FileSystem.Factory.get(); | FileSystem fs = FileSystem.Factory.get(); | ||
| Line 44: | Line 69: | ||
// 关闭文件输出流FileOutStream实例,结束写文件操作 | // 关闭文件输出流FileOutStream实例,结束写文件操作 | ||
| − | out.close(); | + | out.close(); |
| − | + | 然后执行 javac -classpath /root/mesos/alluxio-1.5.0/client/flink/alluxio-1.5.0-flink-client.jar XXX.java 以及 java -cp .:client/flink/alluxio-1.5.0-flink-client.jar XXX | |
| + | === 用Python === | ||
| + | |||
| + | 首先需要pip install alluxio | ||
| + | |||
| + | import json | ||
| + | import sys | ||
| + | import alluxio | ||
| + | from alluxio import option | ||
| + | client = alluxio.Client('10.1.0.180', 39999) | ||
| + | with client.open('/XXX.txt', 'w') as f: | ||
| + | f.write('Alluxio works with Python!\n') | ||
| + | with open(sys.argv[0]) as this_file: | ||
| + | f.write(this_file) | ||
| + | |||
| + | == 我想要在Ceph读数据 == | ||
| + | |||
| + | === 用Java === | ||
| + | import alluxio.client.file.*; | ||
| + | import alluxio.AlluxioURI; | ||
// 获取文件系统客户端FileSystem实例 | // 获取文件系统客户端FileSystem实例 | ||
FileSystem fs = FileSystem.Factory.get(); | FileSystem fs = FileSystem.Factory.get(); | ||
| − | // 构造Alluxio路径AlluxioURI实例 | + | // 构造Alluxio路径AlluxioURI实例 这个'/'默认在'/mnt/data'下 |
AlluxioURI path = new AlluxioURI("/myFile"); | AlluxioURI path = new AlluxioURI("/myFile"); | ||
| Line 63: | Line 107: | ||
in.close(); | in.close(); | ||
| + | 然后执行 javac -classpath /root/mesos/alluxio-1.5.0/client/flink/alluxio-1.5.0-flink-client.jar XXX.java 以及 java -cp .:client/flink/alluxio-1.5.0-flink-client.jar XXX | ||
| − | == | + | === 用python === |
| − | + | 需要先pip install alluxio | |
| + | import json | ||
| + | import sys | ||
| + | import alluxio | ||
| + | from alluxio import option | ||
| + | client = alluxio.Client('10.1.0.180', 39999) | ||
| + | with client.open('/XXX.txt', 'r') as f: | ||
| + | print f.read() | ||
| + | |||
| + | 更多操作请参考: https://www.alluxio.org/docs/1.6/en/Clients-Python.html | ||
| + | |||
| + | == 我想要同时用Ceph跟HDFS == | ||
| + | // 需要import | ||
import alluxio.client.file.FileInStream; | import alluxio.client.file.FileInStream; | ||
import alluxio.client.file.FileOutStream; | import alluxio.client.file.FileOutStream; | ||
import alluxio.client.file.FileSystem; | import alluxio.client.file.FileSystem; | ||
| − | + | // 把HDFS mount到Alluxio | |
| − | // | + | |
FileSystem fileSystem = FileSystem.Factory.get(); | FileSystem fileSystem = FileSystem.Factory.get(); | ||
| − | fileSystem.mount("/mnt/hdfs", "hdfs://... | + | fileSystem.mount("/mnt/hdfs", "hdfs://10.10.0.1:9000/hdfs/data1"); |
| − | + | // 从HDFS读取数据 | |
| − | + | ||
| − | // | + | |
AlluxioURI inputUri = new AlluxioURI("/mnt/hdfs/input.data"); | AlluxioURI inputUri = new AlluxioURI("/mnt/hdfs/input.data"); | ||
FileInStream is = fileSystem.openFile(inputUri); | FileInStream is = fileSystem.openFile(inputUri); | ||
... // read data | ... // read data | ||
is.close(); | is.close(); | ||
| − | |||
... // perform computation | ... // perform computation | ||
| − | + | // 写数据到HDFS | |
| − | // | + | AlluxioURI outputUri = new AlluxioURI("/mnt/hdfs/output.data"); |
| − | AlluxioURI outputUri = new AlluxioURI("/mnt/ | + | |
FileOutStream os = fileSystem.createFile(outputUri); | FileOutStream os = fileSystem.createFile(outputUri); | ||
... // write data | ... // write data | ||
os.close(); | os.close(); | ||
| + | |||
| + | == 关于Alluxio的API reference == | ||
| + | |||
| + | https://docs.oracle.com/javase/7/docs/api/java/nio/file/FileSystem.html | ||
| + | |||
| + | https://www.alluxio.org/docs/1.5/en/File-System-API.html | ||
| + | |||
| + | https://www.alluxio.com/blog/unified-namespace-allowing-applications-to-access-data-anywhere | ||
| + | |||
| + | == 我想要在Alluxio运行Hadoop == | ||
| + | Hadoop被安装在10.1.0.1~10.1.0.10并有90T HDFS空间,需要运行Hadoop without Alluxio可以联系我 ctj2015@mail.tsinghua.edu.cn | ||
| + | |||
| + | 因为Alluxio还在开发两个底层系统整合,所以如果有同学想要在Alluxio运行Hadoop,我需要在10.1.0.180里面修改alluxio-env.sh跟alluxio-site.properties里面的alluxio.underfs.address=hdfs://node-1:9000/hdfs/data1跟ALLUXIO_UNDERFS_ADDRESS=hdfs://node-1:9000/hdfs/data1并且关掉Ceph的ALLUXIO_UNDERFS_ADDRESS,有需求的同学也请联系我。 | ||
| + | |||
| + | = 在Spark中运行Alluxio = | ||
| + | 请自行搭建Spark之后的教程请参见: https://www.alluxio.org/docs/1.0/en/Running-Spark-on-Alluxio.html | ||
| + | |||
| + | = 用Tensorflow运行分布式GPU运算 = | ||
| + | 首先你要记得在你申请Docker的时候,需要特别注明你的Docker虚拟机所在的物理机的IP,否则虽然建立起了多个Docker虚拟机但是还是在同一台机器的GPU进行计算反而会降低效率。 | ||
| + | 下面这个Excel表格是所有带GPU的服务器物理地址,以及他们虚拟机的公网IP | ||
| + | |||
| + | 如何知道我的公网Ip? 你可以ifconfig查询172地址然后找Excel找出对应的。 | ||
| + | |||
| + | https://docs.google.com/spreadsheets/d/1_nia7F0xqIrlIsPpR5ZCayH9CaA9wA38KXObR_WVMwo/edit?usp=sharing | ||
| + | |||
| + | 关于怎么用Tensorflow写分布式可以参见 | ||
| + | |||
| + | https://learningtensorflow.com/lesson11/ | ||
| + | |||
| + | Tensorflow的数据输入输出需要参考前面的Alluxio的输入输出来写,还有记得要写ssh-keygen -t rsa 让虚拟机进行无密码登录 | ||
Latest revision as of 20:47, 25 January 2018
Docker使用Alluxio教程
Contents
什么是Alluxio?
Alluxio是一个基于内存的分布式文件系统,它是架构在底层分布式文件系统和上层分布式计算框架之间的一个中间件,主要职责是以文件形式在内存或其它存储设施中提供数据的存取服务。
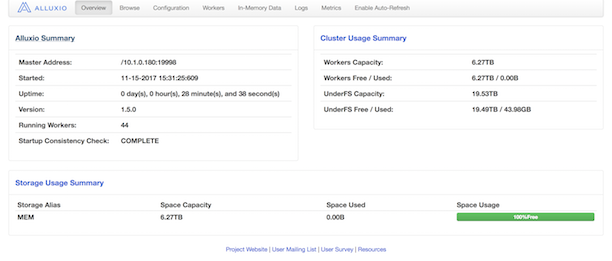
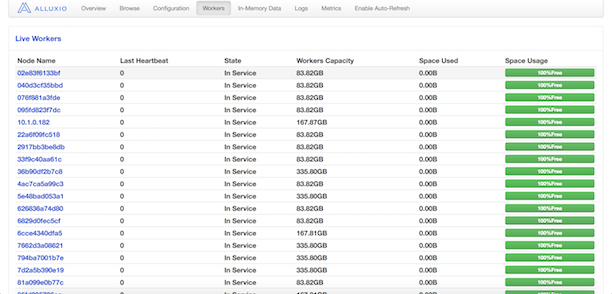
徐葳老师希望所有Docker虚拟机共享内存中的文件,这样就可以快速读取文件信息。搭出来的Alluxio是这样的。
可以在 http://10.1.0.180:19999/home 看到
我们的Alluxio
我们的Alluxio的底层存储系统有两个: Ceph与HDFS。利用Alluxio’s unified namespace有两个优势:
1)程序可以使用相同的命名空间和接口,在不同的底层存储系统中通信。程序和新的存储之间无缝结合。
2)仅需把数据在内存中加载一次,你的程序就能以不同类型的存储系统进行访问。
我们的Docker虚拟机默认连接的是Ceph。需要调用Alluxio的API才能把数据加载到内存中。例子是如何用Java在Ceph中读取/写入数据:
默认路径是/mnt/data,读取/写入数据请从新构造一个文件夹:
Alluxio的位置
cd /root/mesos/alluxio-1.5.0
我想上传数据到Alluxio内存中
首先把数据复制到
   mount -t nfs 10.1.0.180:/mnt/data /mnt/data
   /mnt/data
然后用
./mesos/alluxio-1.5.0/bin/alluxio fs ls /
查看是否添加上去,复制完到Alluxio能读到一般需要一段时间请耐心等待。
./bin/alluxio fs load /XXX.txt把文件加载到内存中,15G文件一般要加载一分多钟。
./bin/alluxio fs ls /XXX.txt就可以看到该文件In Memory。
你可以简单的执行
./mesos/alluxio-1.5.0/bin/alluxio fs cat /XXX.txt | grep -c 0
我想要在Ceph写数据
用Java
   import alluxio.client.file.*;
   import alluxio.AlluxioURI;
   // 获取文件系统客户端FileSystem实例
   FileSystem fs = FileSystem.Factory.get();

   // 构造Alluxio路径AlluxioURI实例
   AlluxioURI path = new AlluxioURI("/myFile");

   // 设置一些操作选项
   // 设置文件块大小为128M
   CreateFileOptions options = CreateFileOptions.defaults().setBlockSize(128 * Constants.MB);

   // 创建一个文件并获取它的文件输出流FileOutStream实例
   FileOutStream out = fs.createFile(path);

   // 调用文件输出流FileOutStream实例的write()方法写入数据
   out.write(...);

   // 关闭文件输出流FileOutStream实例,结束写文件操作
   out.close();
然后执行 javac -classpath /root/mesos/alluxio-1.5.0/client/flink/alluxio-1.5.0-flink-client.jar XXX.java 以及 java -cp .:client/flink/alluxio-1.5.0-flink-client.jar XXX
用Python
首先需要pip install alluxio
   import json
   import sys
   import alluxio
   from alluxio import option
   client = alluxio.Client('10.1.0.180', 39999)
   with client.open('/XXX.txt', 'w') as f:
       f.write('Alluxio works with Python!\n')
       with open(sys.argv[0]) as this_file:
           f.write(this_file)
我想要在Ceph读数据
用Java
   import alluxio.client.file.*;
   import alluxio.AlluxioURI;
   // 获取文件系统客户端FileSystem实例
   FileSystem fs = FileSystem.Factory.get();

   // 构造Alluxio路径AlluxioURI实例 这个'/'默认在'/mnt/data'下
   AlluxioURI path = new AlluxioURI("/myFile");

   // 打开一个文件,获得文件输入流FileInStream(同时获得一个锁以防止文件被删除)
   FileInStream in = fs.openFile(path);

   // 调用文件输入流FileInStream实例的read()方法读数据
   in.read(...);

   // 关闭文件输入流FileInStream实例,结束读文件操作(同时释放锁)
   in.close();
然后执行 javac -classpath /root/mesos/alluxio-1.5.0/client/flink/alluxio-1.5.0-flink-client.jar XXX.java 以及 java -cp .:client/flink/alluxio-1.5.0-flink-client.jar XXX
用python
需要先pip install alluxio
   import json
   import sys
   import alluxio
   from alluxio import option
   client = alluxio.Client('10.1.0.180', 39999)
   with client.open('/XXX.txt', 'r') as f:
       print f.read()
更多操作请参考: https://www.alluxio.org/docs/1.6/en/Clients-Python.html
我想要同时用Ceph跟HDFS
  // 需要import
  import alluxio.client.file.FileInStream;
  import alluxio.client.file.FileOutStream;
  import alluxio.client.file.FileSystem;
  // 把HDFS mount到Alluxio
  FileSystem fileSystem = FileSystem.Factory.get();
  fileSystem.mount("/mnt/hdfs", "hdfs://10.10.0.1:9000/hdfs/data1");
  // 从HDFS读取数据
  AlluxioURI inputUri = new AlluxioURI("/mnt/hdfs/input.data");
  FileInStream is = fileSystem.openFile(inputUri);
  ... // read data
  is.close();
  ... // perform computation
  // 写数据到HDFS
  AlluxioURI outputUri = new AlluxioURI("/mnt/hdfs/output.data");
  FileOutStream os = fileSystem.createFile(outputUri);
  ... // write data
  os.close();
关于Alluxio的API reference
https://docs.oracle.com/javase/7/docs/api/java/nio/file/FileSystem.html
https://www.alluxio.org/docs/1.5/en/File-System-API.html
https://www.alluxio.com/blog/unified-namespace-allowing-applications-to-access-data-anywhere
我想要在Alluxio运行Hadoop
Hadoop被安装在10.1.0.1~10.1.0.10并有90T HDFS空间,需要运行Hadoop without Alluxio可以联系我 ctj2015@mail.tsinghua.edu.cn
因为Alluxio还在开发两个底层系统整合,所以如果有同学想要在Alluxio运行Hadoop,我需要在10.1.0.180里面修改alluxio-env.sh跟alluxio-site.properties里面的alluxio.underfs.address=hdfs://node-1:9000/hdfs/data1跟ALLUXIO_UNDERFS_ADDRESS=hdfs://node-1:9000/hdfs/data1并且关掉Ceph的ALLUXIO_UNDERFS_ADDRESS,有需求的同学也请联系我。
在Spark中运行Alluxio
请自行搭建Spark之后的教程请参见: https://www.alluxio.org/docs/1.0/en/Running-Spark-on-Alluxio.html
用Tensorflow运行分布式GPU运算
首先你要记得在你申请Docker的时候,需要特别注明你的Docker虚拟机所在的物理机的IP,否则虽然建立起了多个Docker虚拟机但是还是在同一台机器的GPU进行计算反而会降低效率。 下面这个Excel表格是所有带GPU的服务器物理地址,以及他们虚拟机的公网IP
如何知道我的公网Ip? 你可以ifconfig查询172地址然后找Excel找出对应的。
https://docs.google.com/spreadsheets/d/1_nia7F0xqIrlIsPpR5ZCayH9CaA9wA38KXObR_WVMwo/edit?usp=sharing
关于怎么用Tensorflow写分布式可以参见
https://learningtensorflow.com/lesson11/
Tensorflow的数据输入输出需要参考前面的Alluxio的输入输出来写,还有记得要写ssh-keygen -t rsa 让虚拟机进行无密码登录

